
SCHEMAGROVE DOCUMENTATION
Run schema as a system, not a page-by-page chore.
SchemaGrove turns structured data into a visual graph. This guide starts with one page, explains when to use Templates and Entities, and follows your graph all the way to public JSON-LD.
I am installing SchemaGrove
Install Lite from WordPress.org, activate it, and open Guided setup.
I am building my first graph
Select one page, add values, validate the graph, preview the JSON-LD, and save it.
I need schema on many pages
Use a Pro Template for reusable graph rules and a Pro Entity for a reusable identity.
I saved a graph but see no output
Check validation, schema ownership, the publishing switch, and the enabled content type.
Version note: These instructions match SchemaGrove Lite 1.0.8 and SchemaGrove Pro 1.0.8. Pro 1.0.8 requires Lite 1.0.8 or newer to be active.
Build your first schema graph
A graph belongs to the selected WordPress post or page. The type card is the entity, the smaller cards are its properties, and each line shows which property belongs to which entity.
Install SchemaGrove Lite
In WordPress, open Plugins → Add New Plugin. Search for “SchemaGrove,” choose Install Now, and then choose Activate.
Open SchemaGrove in the WordPress admin menu. Guided setup opens on a new installation and helps establish the site identity, starting workspace, and schema ownership plan.
Prefer a direct download? Get the current Lite release from the SchemaGrove page on WordPress.org.
Optional: finish Guided setup first
The setup wizard asks what the site represents, its general focus, where you want to begin, and who should publish schema. It creates a starting plan; it does not save a graph or change another plugin’s settings.
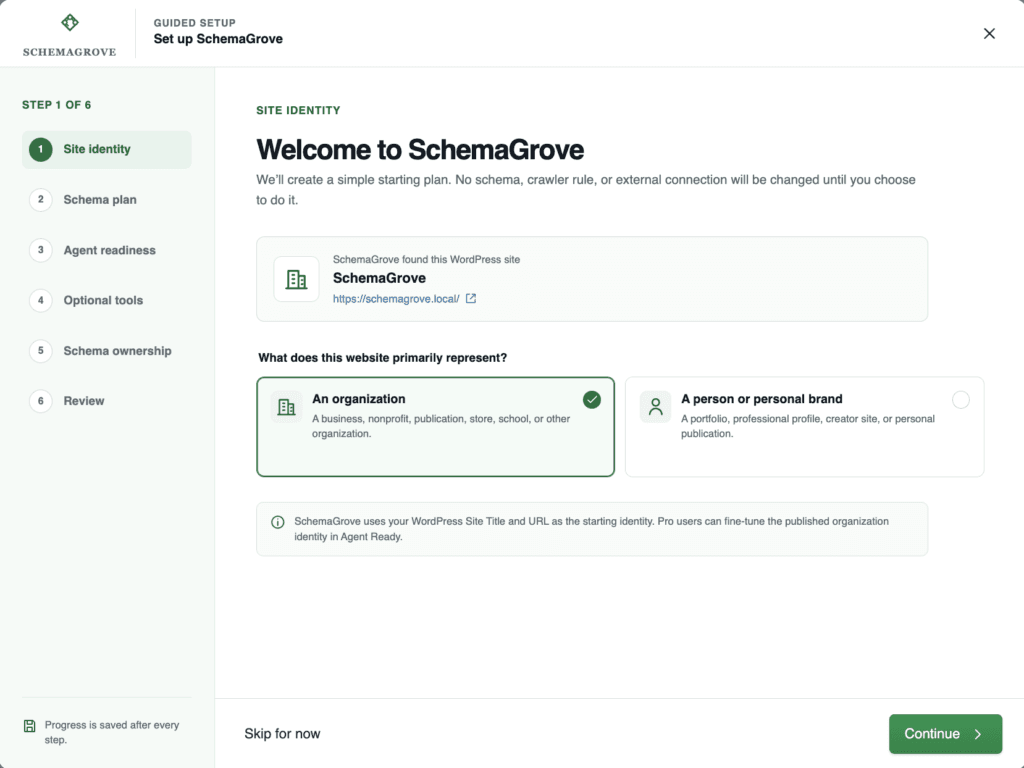
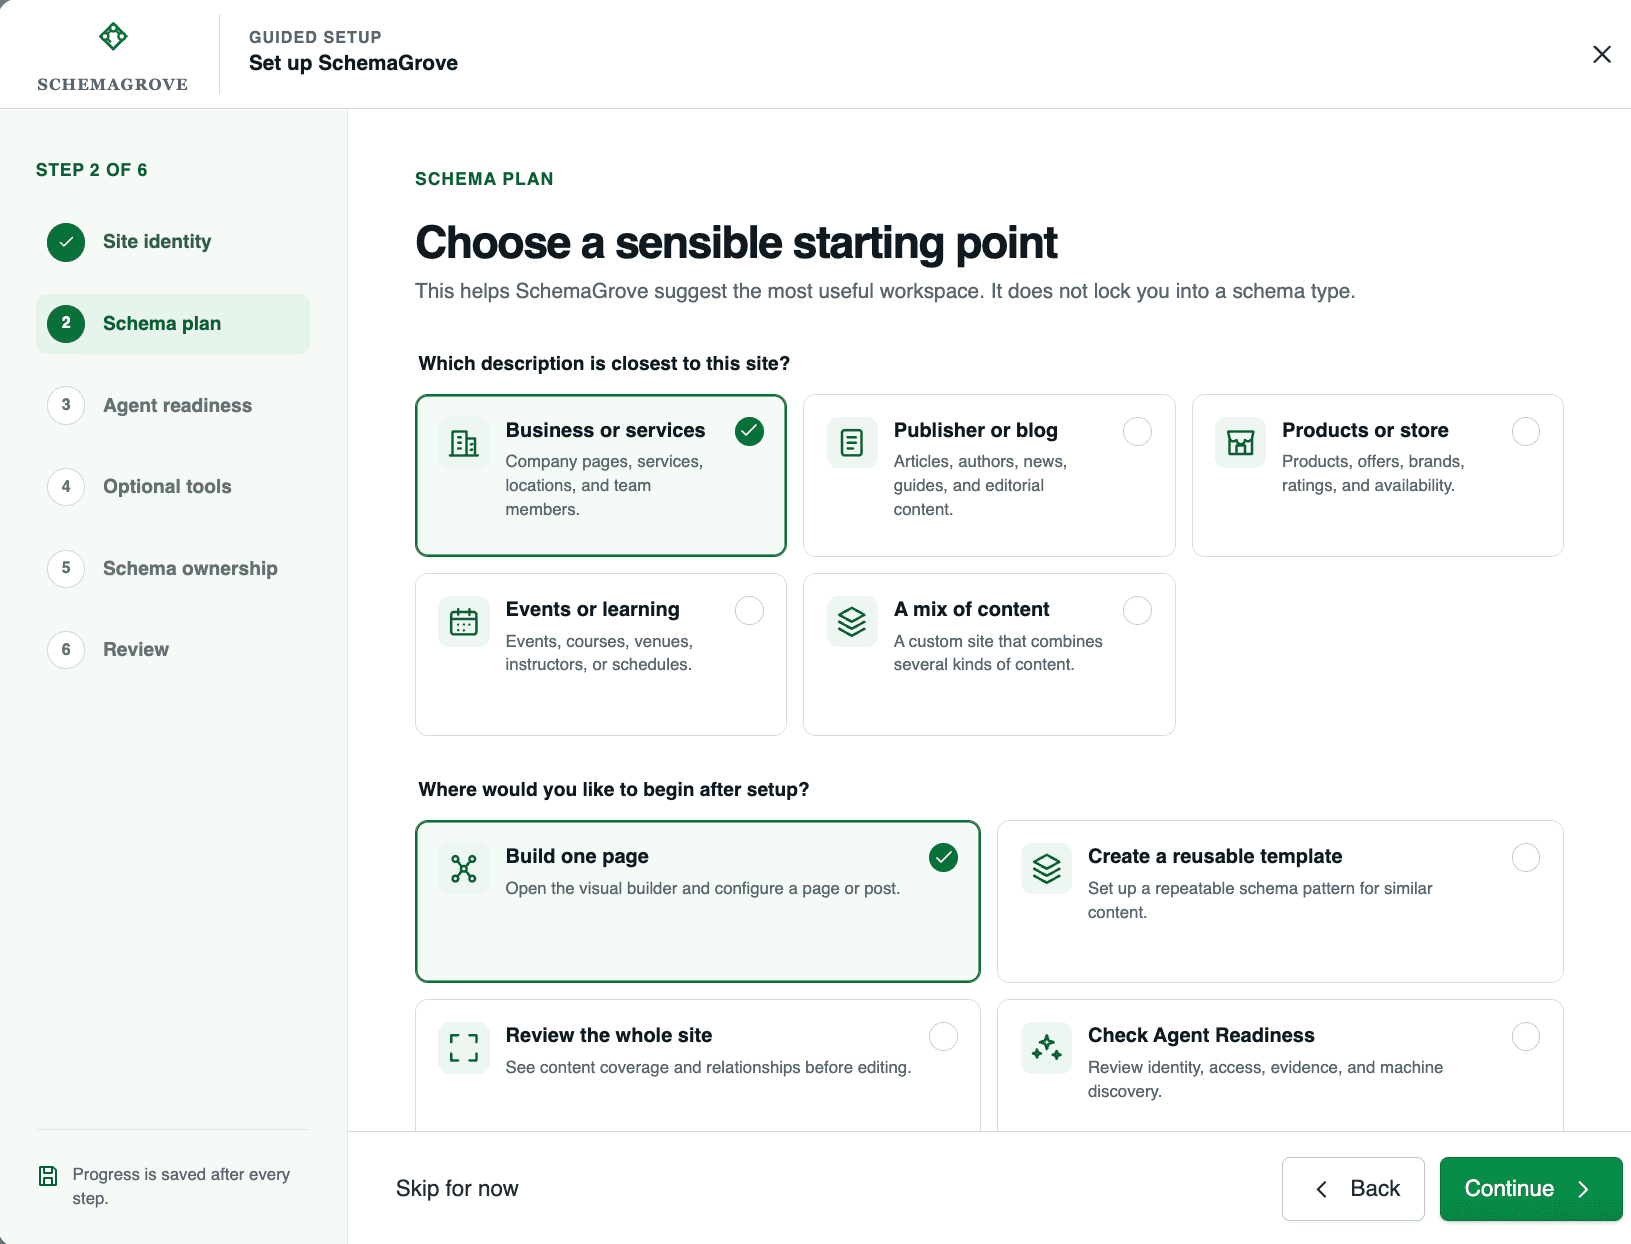
Guided setup explains the initial choices in plain language and can be reopened later from Settings → Guided setup.
Step by step
Open SchemaGrove → Schema Graph. Use the Editing: selector to choose the post, page, product, or other enabled public content item you want to configure.
Choose a starting graph. SchemaGrove normally supplies a sensible starter such as WebPage, BlogPosting, or Product. To replace the whole graph, choose Start over, select a starter, Minimal custom graph, or Empty workspace, then choose Replace graph.
Add or select a property. Choose the connected Add property card or open the entity’s three-dot menu and choose Add property. The Add a property dialog focuses its search field automatically, so you can type immediately. Choose the property you need.
Choose the value source. Select the property card and use the Content tab in the Property inspector. Choose a Source, then supply the value. The Output preview shows what SchemaGrove can resolve.
Validate before saving. Choose Validate, correct errors, and review warnings. Then choose Preview JSON-LD to inspect the exact generated document.
Choose Save schema. Wait for Draft saved. Saving stores the page graph; public output also depends on the publishing and ownership checklist later in this guide.
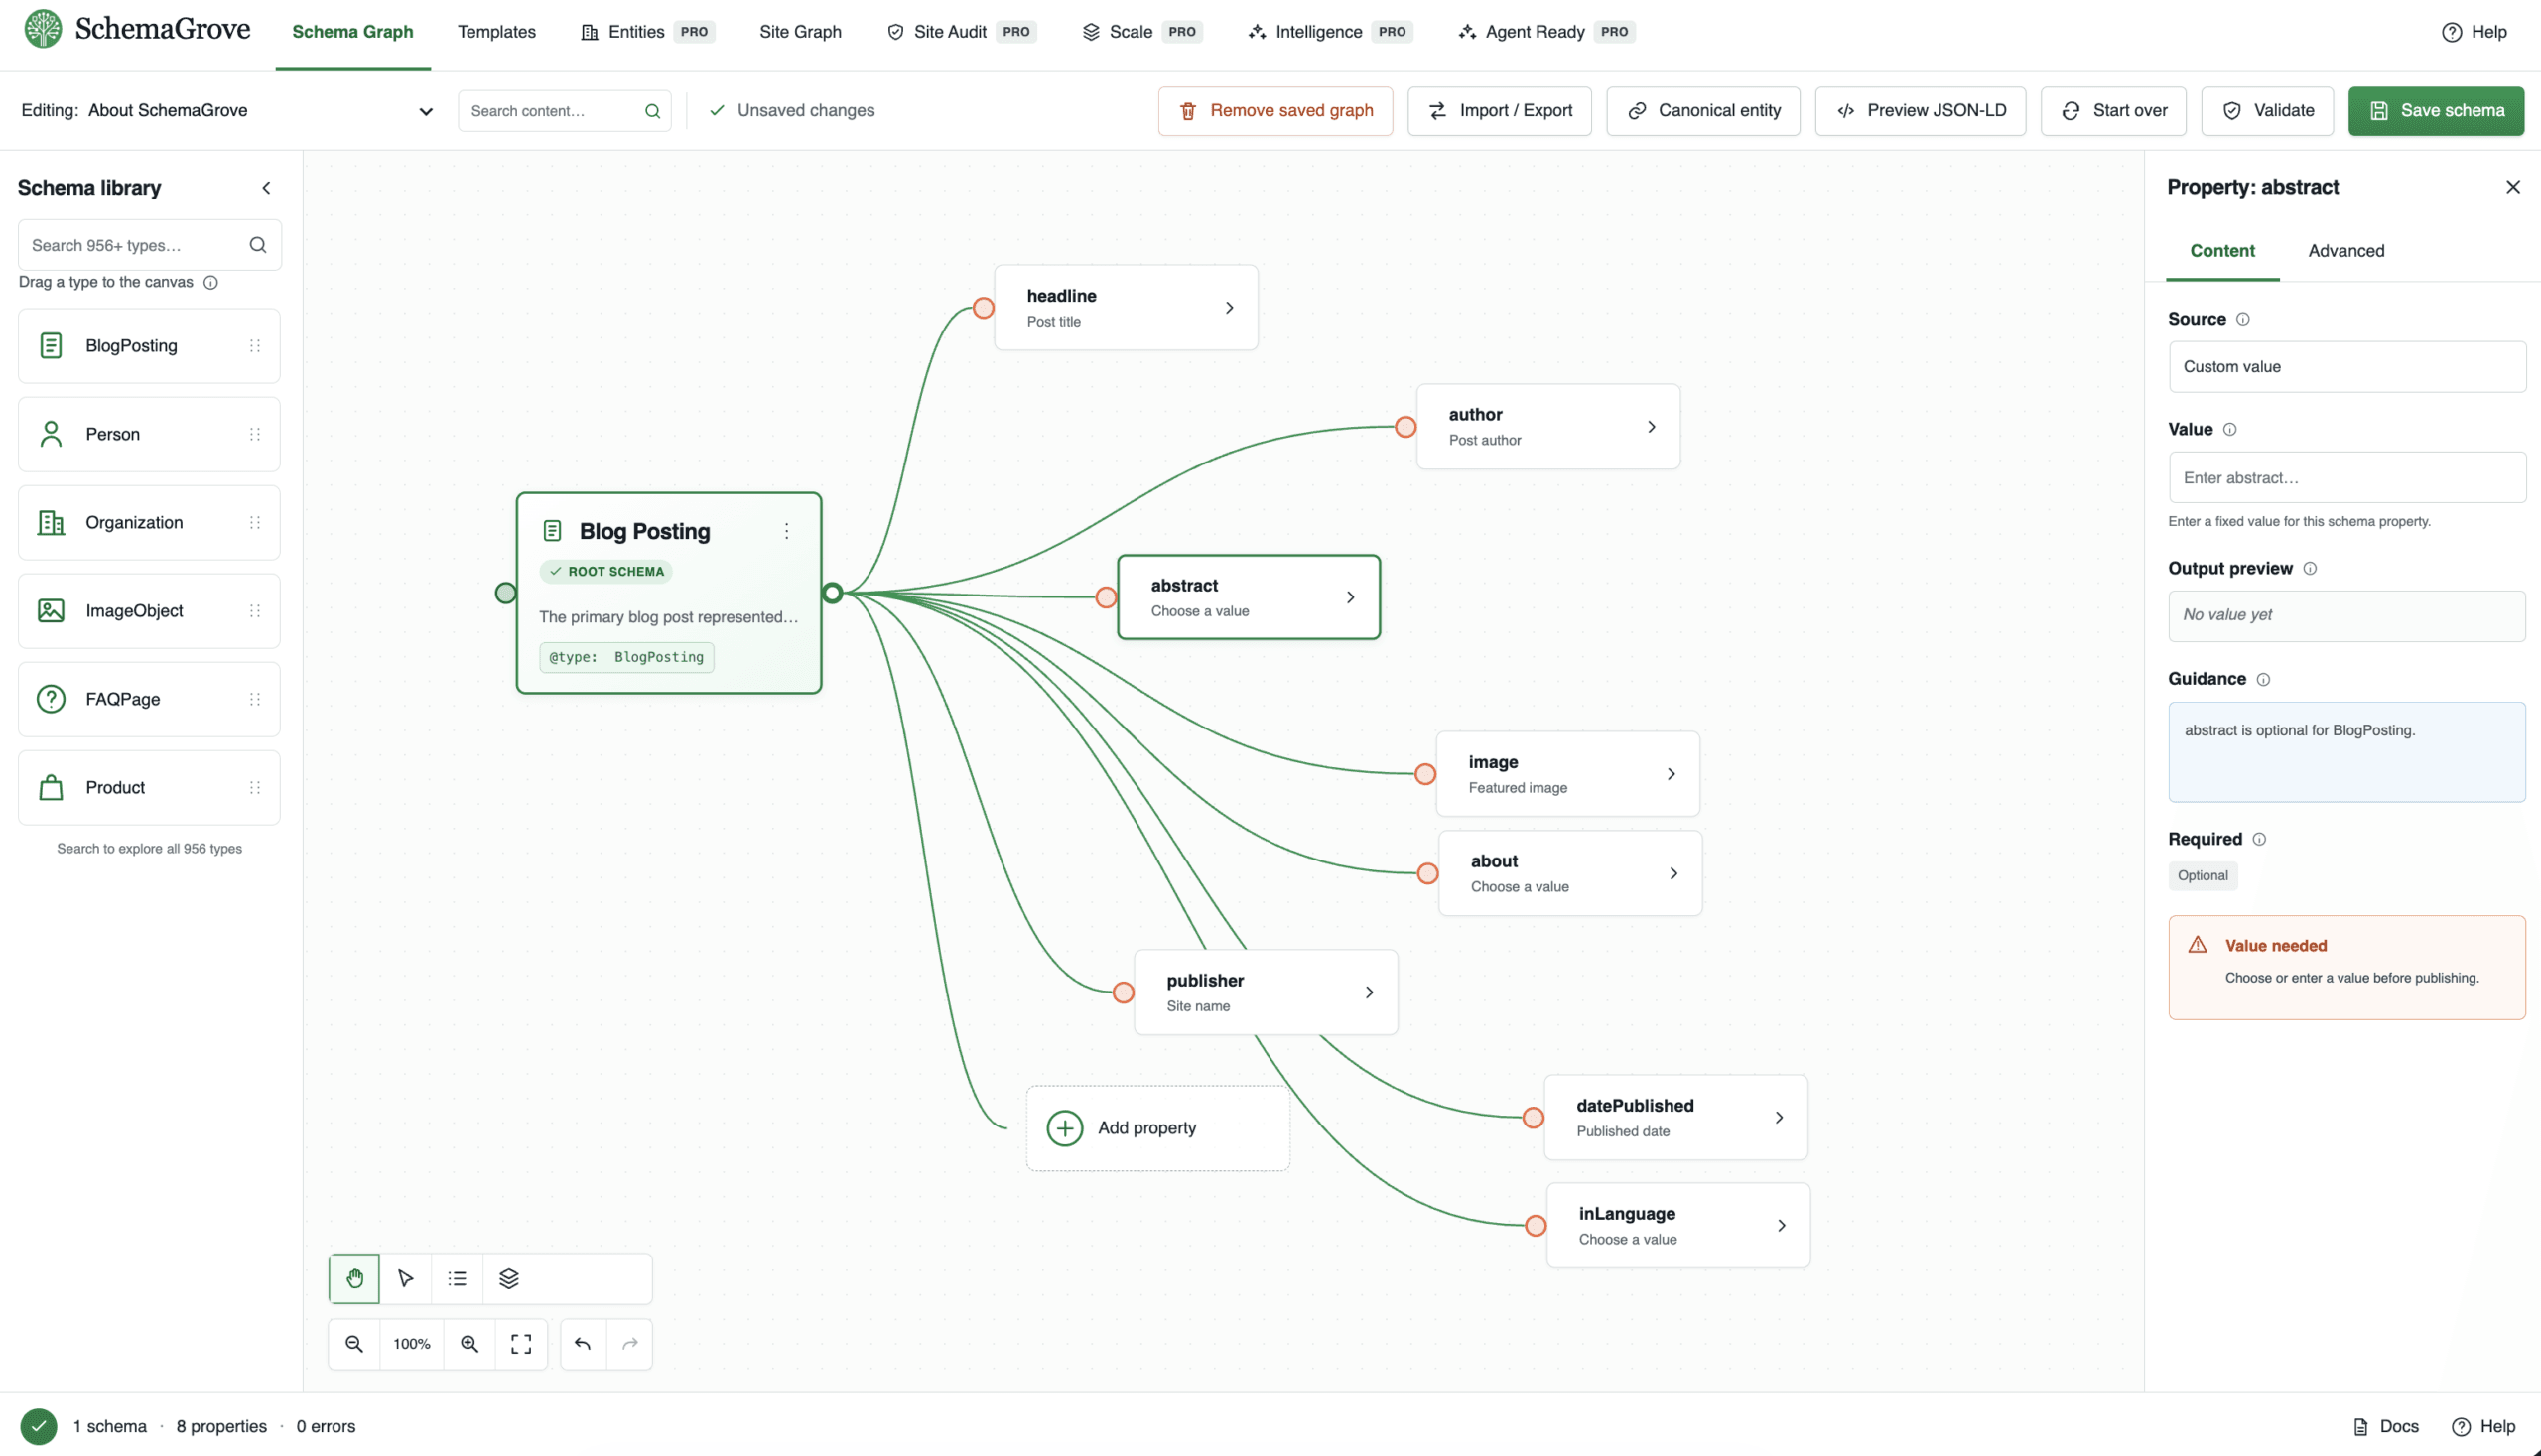
The Schema Graph workspace keeps the type library on the left, relationships on the canvas, and the selected property’s settings in the inspector.
Which Source should I use?
| Source | Use it when | Example |
|---|---|---|
| Dynamic value | The value should follow WordPress content automatically. | Page title, permalink, author name, featured image, or site name. |
| Custom value | The same fixed value belongs in this saved graph. | A stable @id, legal name, or fixed external URL. |
| Connected entity | The property should point to another entity already on this graph. | A BlogPosting publisher pointing to an Organization node. |
| Multiple values | The property legitimately accepts more than one value. | Several sameAs links or several FAQ questions. |
Canvas shortcut: Select either Pan canvas or Select and move nodes. Hold Option on macOS or Alt on Windows/Linux to use the opposite tool temporarily. Release the key to return to the selected tool. Command/Ctrl + mouse wheel controls canvas zoom.
Templates decide where; Entities decide who or what
A Template and an Entity solve different problems. Most site-wide identity workflows use them together: the Entity holds one stable identity, while the Template places that identity on every matching page.
| Workspace | What it owns | Best use | Availability |
|---|---|---|---|
| Schema Graph | One saved graph on one WordPress content item. | Page-specific facts and overrides. | Lite and Pro |
| Templates | A reusable graph plus conditional assignment rules and revisions. | Applying common schema to many matching posts, pages, or products. | Pro |
| Entities | A canonical real-world identity with a stable @id. | An Organization, Person, Place, or Brand reused without copying identity data. | Pro |
Important: In 1.0.8, Canonical entities is an identity registry, not a second free-form graph editor. It manages the entity name, Schema.org type, immutable Canonical @id URL, state, description, and official external identity links. Build page structure and other connected nodes in the Schema Graph or Template visual builder.
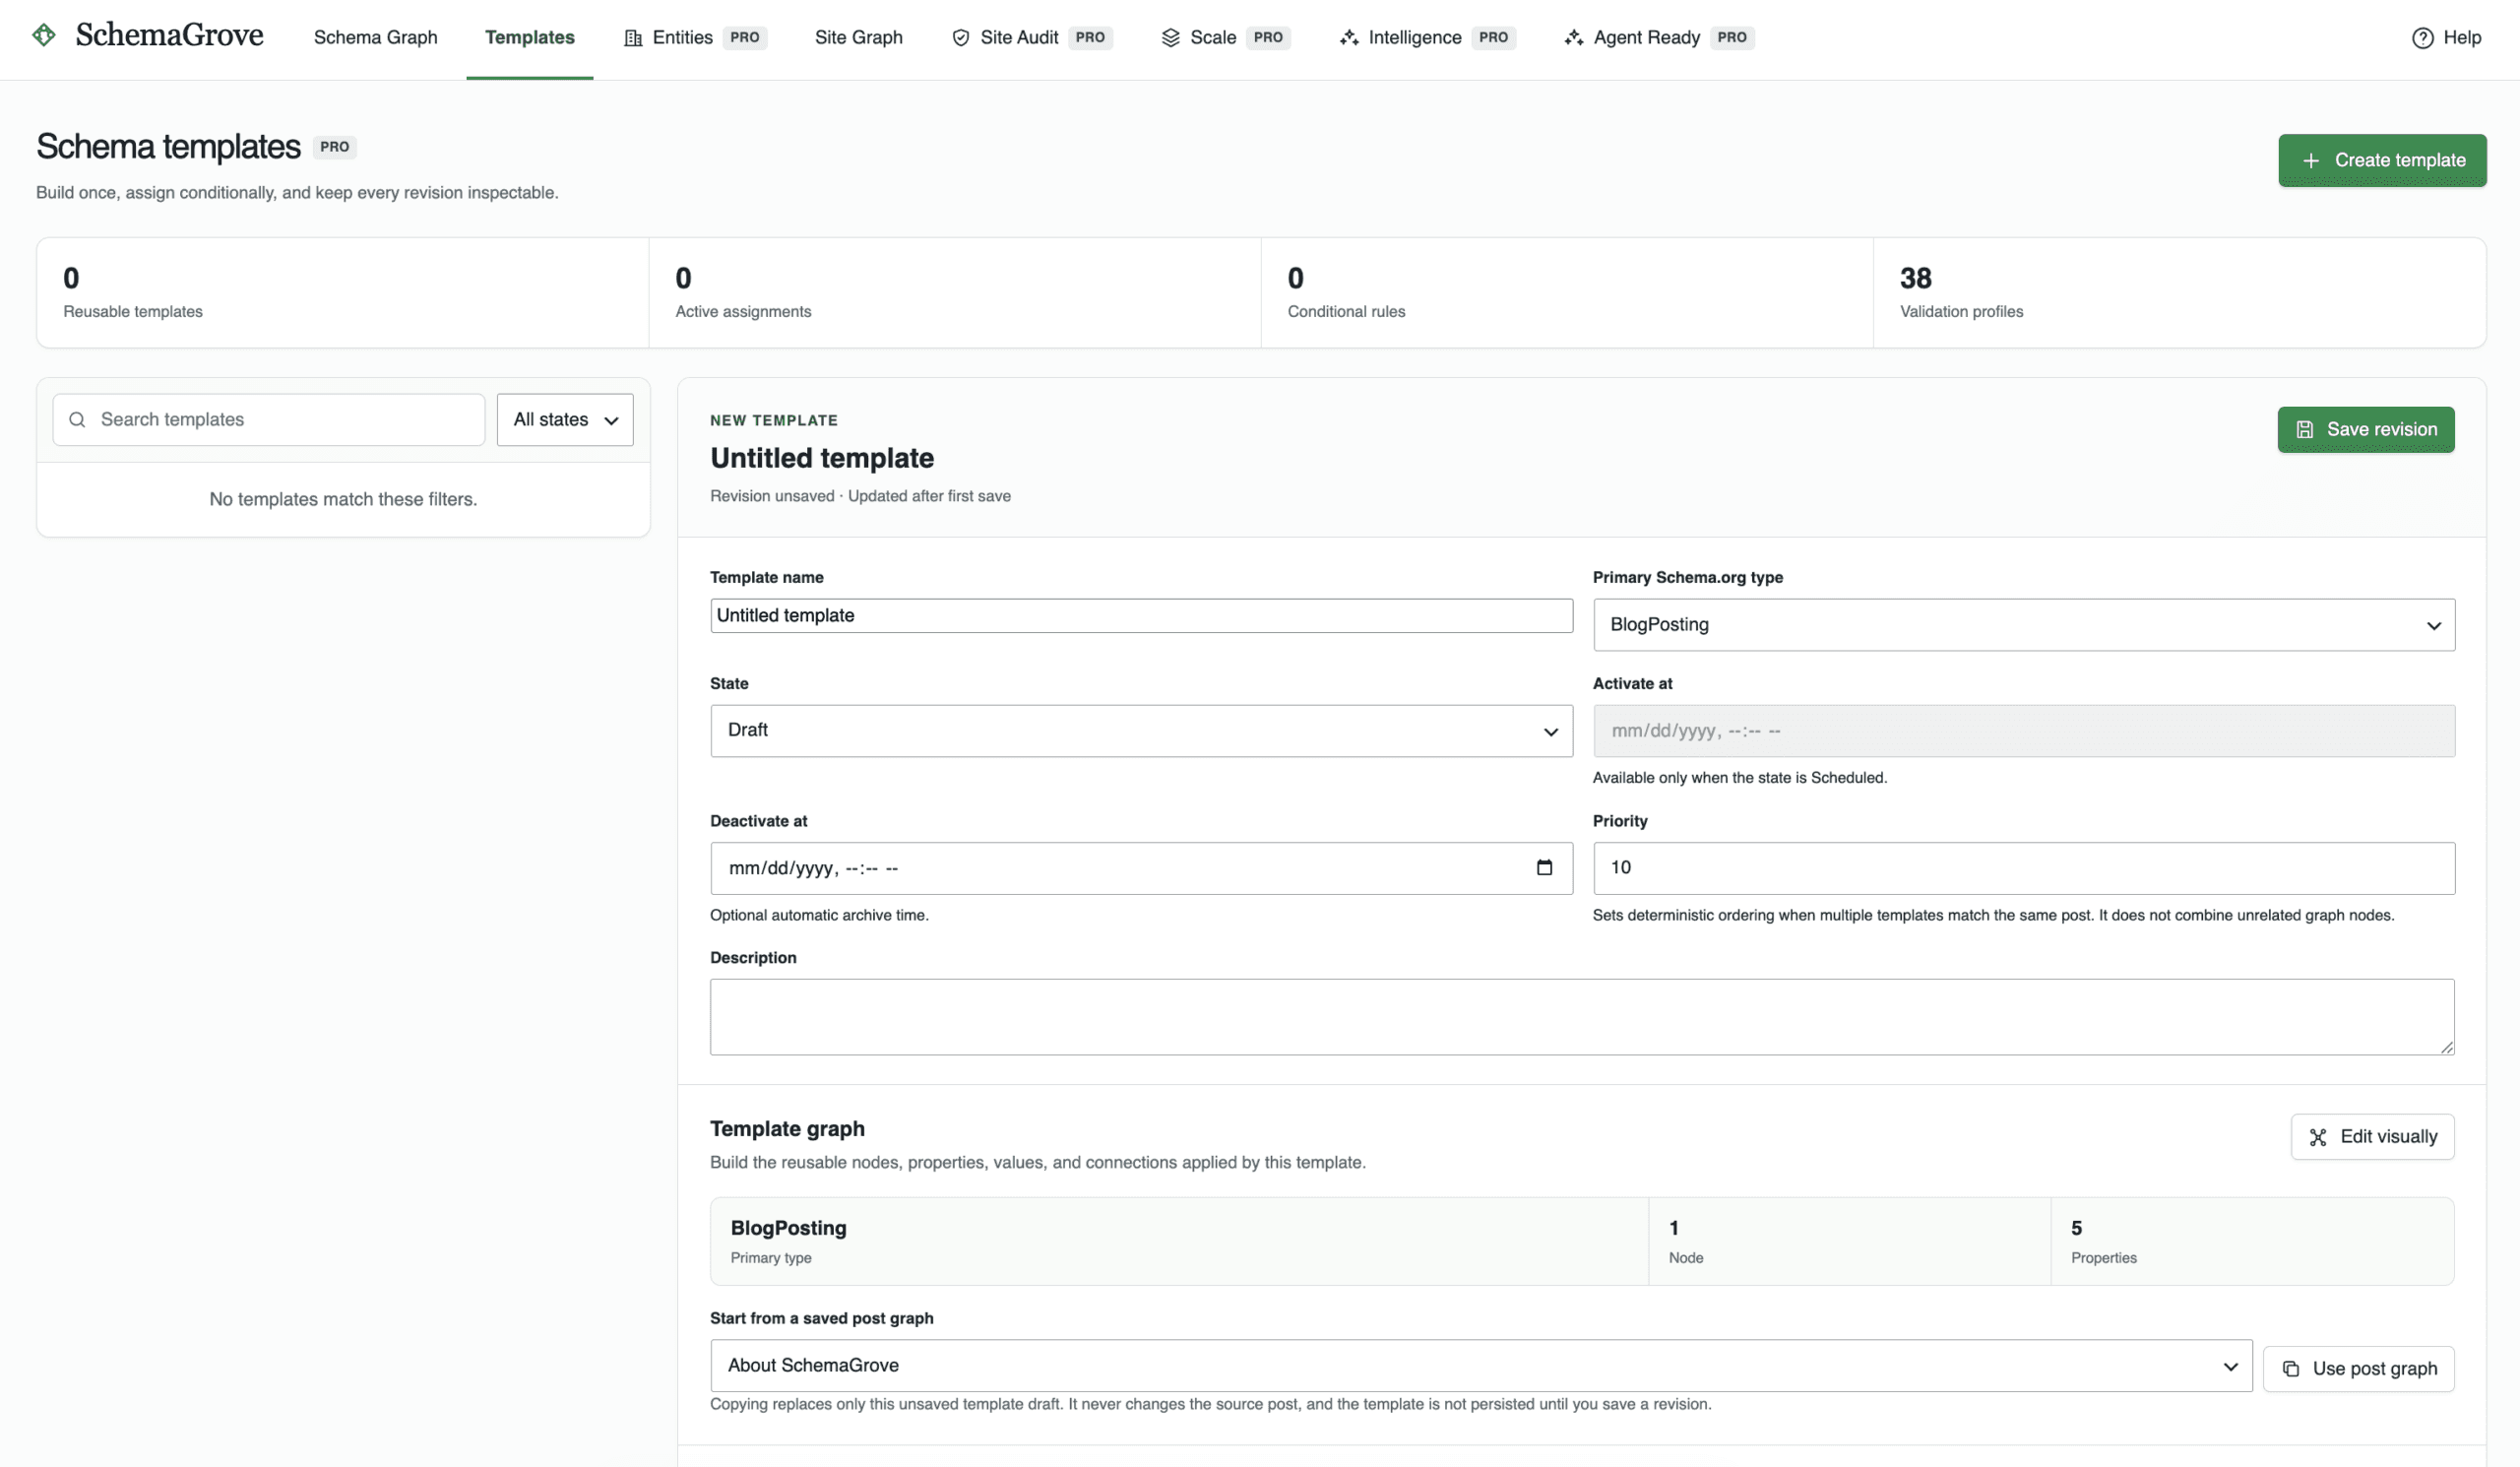
A Pro Template combines a reusable graph with assignment conditions. It remains a draft until its state is changed and the revision is saved.
Exact workflow: create one Organization and reuse it site-wide
This Pro workflow publishes one canonical Organization identity on every eligible singular URL that matches the template. Replace example.com with your own canonical HTTPS domain.
Part 1: create the canonical identity
Open SchemaGrove → Entities and choose Create entity.
Complete the identity fields. Entity name: your public organization name. Schema.org type: Organization. State: Active. Canonical @id URL:
https://example.com/#organization. Description: a concise description of the organization.Add only official identity profiles. Under External identity links, choose Add URL for each official profile that represents the same organization.
Choose Save revision. Confirm that the record says Available in the graph editor.
Part 2: place that identity with a Template
Open SchemaGrove → Templates and choose Create template. Set Template name to “Site-wide Organization,” set Primary Schema.org type to Organization, and leave State as Draft while building.
Under Template graph, choose Edit visually.
Clear the starter before linking the canonical record. Choose Start over → Empty workspace → Replace graph. This avoids keeping a second, unlinked Organization beside the canonical one.
Choose Canonical entity in the visual-builder toolbar. In Link canonical entity, select the Organization, choose Add as graph root, and then choose Link entity.
Validate, then choose Save graph & return. This applies the visual graph to the unsaved template draft. It does not yet save the template revision.
Add the site-wide condition. Under Conditional assignment, choose Condition and set URL → starts with →
https://example.com/. This matches eligible singular content under that site origin. For a narrower rule, use Post type or an exact URL.Test before activation. In Assignment simulator, choose a representative page and choose Simulate. Look for Template applies.
Set State to Active (requires a condition), then choose Save revision.
How updates work: linked canonical records are refreshed from the Entities registry when SchemaGrove builds the effective graph. Edit the Organization once in Entities and save a new revision; graphs that link it use the current active record.
Per-post overrides come last. When Pro is active, a matching active Template can supply the effective graph, and a saved graph on the individual post is applied afterward as the override. Preview a representative page whenever both layers are present.
Nest Brand → logo → ImageObject
Schema properties can point to another schema entity. SchemaGrove shows the full chain: Brand connects to its logoproperty, that property connects to an ImageObject, and the ImageObject connects to its own child properties.
Use a nested schema when the child needs its own identity or properties. If all you need is one image URL and the property accepts URL, a normal value may be enough. The nested ImageObject is useful when you need a stable image @id, contentUrl, caption, dimensions, or other image details.
Open Schema Graph and select the content item to edit.
Start with a Brand root. Choose Start over → Empty workspace → Replace graph. In Schema library, search for Brand and choose or drag it onto the canvas. As the first entity, it becomes the Root schema.
Add Entity ID, name, url, and logo. Use Add property for each. Select each property, choose Custom value, and enter the Brand values. For this neutral example use: Entity ID:
https://example.com/#brandname: Example Brand url:https://example.com/Select the logo property card. In the inspector’s Content tab, find Nested schema. If more than one compatible type is listed, select ImageObject.
Choose Create nested schema ImageObject. SchemaGrove creates the child, connects
logoto it, adds an Entity ID property, and selects that new field. The entire creation is one undoable action.Enter the ImageObject identity. Set its Entity ID to
https://example.com/#logo. Optionally use the child’s Add property card to addcontentUrland other image details.Choose Validate, Preview JSON-LD, and Save schema.
Expected JSON-LD shape
SchemaGrove keeps the child as a separately identified graph node and publishes an @id reference from the Brand’s logoproperty:
					{
  "@context": "https://schema.org",
  "@graph": [
    {
      "@type": "Brand",
      "@id": "https://example.com/#brand",
      "name": "Example Brand",
      "url": "https://example.com/",
      "logo": {
        "@id": "https://example.com/#logo"
      }
    },
    {
      "@type": "ImageObject",
      "@id": "https://example.com/#logo"
    }
  ]
}
Nesting can continue. Select an object-compatible property on the ImageObject or another child and use Create nested schema again. Use Auto-organize graph when a deeper graph becomes hard to read; Undo is available if you prefer the previous layout.
Publishing requires both a valid graph and a safe output plan
SchemaGrove separates editing from public output. A saved graph can remain available for preview and validation while public JSON-LD is paused by the ownership mode.
Saved graph
The graph revision stored for one content item or in a Pro Template.
Effective graph
The final graph after matching templates, canonical entities, and per-post overrides are resolved.
Public output
The JSON-LD emitted only when validation, settings, and schema ownership all permit it.
Publishing checklist
The graph exists. Open the correct item in Schema Graph and confirm it is saved, or confirm a matching Pro Template is Active.
The graph validates. Choose Validate and resolve every error. Warnings deserve review but are not the same as errors.
The ownership decision allows SchemaGrove output. Open Settings → Schema ownership and confirm the effective status does not say output is paused.
Publish schema markup is enabled. Open Settings → Schema output, enable Publish schema markup, and choose Save settings.
The content type is enabled. Under Settings → Content types, select the public post type and choose Save settings.
The content is a public singular URL. Lite publishes an explicitly saved valid graph on the individual post/page request. Archives and unrelated URLs do not inherit a per-post graph.
The result is verified. Use Preview JSON-LD first, then load the public page and inspect its JSON-LD or test the URL with a structured-data validator.
Choose one schema owner
| Choice shown in Schema ownership | Result |
|---|---|
| Publish my SchemaGrove graphs | Lite can publish valid saved graphs when no competing primary schema producer needs coordination. |
| Keep the SEO plugin in charge | SchemaGrove remains available for building, previewing, and local validation, but does not publish schema. |
| Integrate SchemaGrove into its graph | When a verified Pro adapter is available, compatible SchemaGrove entities are added through the provider graph without emitting a second script. |
| Let SchemaGrove own configured content | With supported Pro coordination, SchemaGrove publishes on managed URLs and suppresses only the other plugin’s schema layer for that request. |
| Decide later | Public SchemaGrove output remains safely off. Graph editing and previews remain available. |
Do not solve duplicates by enabling both plugins and hoping they merge. Available choices depend on the detected provider and verified adapter. If the safe option is unavailable, SchemaGrove fails closed and preserves the provider baseline rather than claiming coordination it cannot verify.
Use Site Graph to understand structure; use Site Audit to test output
These workspaces look at the site from different angles. Site Graph is an interactive map built from WordPress and saved graph data. Site Audit is a Pro inspection run with history and findings.
| Workspace | What it shows | What it does not replace |
|---|---|---|
| Site Graph Lite and Pro | Parent/child structure, stored internal links, saved schema relationships, schema entities, and coverage such as Saved on post, Inherited template, or Not configured. | It does not inspect links or markup created only when the page renders. |
| Site Audit Pro | A versioned run across site URLs with run history, URL counts, errors, warnings, separate validation-profile results, and filterable issues. | It does not edit the graph for you or make consumer-profile warnings equivalent to Schema.org errors. |
Use Site Graph
Open SchemaGrove → Site Graph.
Choose Refresh graph after changing content or settings.
Toggle Parent / child, Internal links, and Schema entities to isolate relationships.
Select an editable content node or use Edit post graph in the coverage table.
Use Site Graph
Open SchemaGrove → Site Audit.
Choose Run site audit. The screen refreshes a queued or active run.
Review URLs scanned, Errors, Warnings, and each separate Validation profile.
Use Search issues or URLs and All severities to narrow findings.
Choose Refresh; use Pause, Resume, Retry, or Cancel only when the run state offers that action.
A warning is a prompt to review, not proof that the page is invalid. Site Audit keeps Schema.org results and consumer-profile results separate so you can see whether a finding is a structural error, a recommendation, or a profile-specific issue.
Activate Pro and keep Lite and Pro paired
SchemaGrove Pro is a separately distributed add-on. Lite remains the shared graph editor and must stay installed and active.
Use Site Graph
Install and activate SchemaGrove Lite first. Confirm Lite is 1.0.8 or newer for Pro 1.0.8.
Install and activate the SchemaGrove Pro ZIP. Do not remove Lite.
Open SchemaGrove → Pro License.
Enter the License key supplied with the purchase and choose Activate license.
Confirm License status shows Active. Review the plan, environment, expiration, last verification, and activation count shown on the page.
Changing keys: if this installation already stores a license, choose Deactivate license before activating a different key. This releases the vendor-side activation instead of leaving an unused activation behind.
Install private updates safely
Back up first. Use a restorable database and files backup before production updates.
Keep versions compatible. Update Lite and Pro together when the release notes specify a paired version.
Refresh when needed. Use Pro License → Refresh status if WordPress does not yet see the current entitlement.
Use WordPress updates. An entitled private Pro release appears through the standard Plugins or Updates screen.
Verify afterward. Confirm both plugins are active, open the main workspaces, and preview a representative graph.
Common license states
| State | What to do |
|---|---|
| Active | No action is required. Private updates and entitled features are available. |
| Offline grace / Renewal grace | Use Refresh status and confirm connectivity or subscription renewal before the displayed grace date. |
| Site moved — reactivation required | The database was copied to a different site address. In your SchemaGrove account, open My Account → API Keys, remove the old activation if the plan is at its limit, then retry activation on the new site. |
| Verification required | Installed Pro functionality remains intact, but private updates and tier entitlements are paused until the activation can be verified. |
The license does not remotely disable installed schema output. Licensing controls private updates, support, and separately entitled Pro packs. If verification exceeds its bounded offline window, installed Pro functionality remains intact while updates and tier entitlements pause.
Troubleshooting
Start with the symptom below. Work through the checks in order and test again after the smallest relevant change.
A saved graph is not publishing JSON-LD
Open the same content item in Schema Graph and choose Validate.
Open Settings → Schema ownership and confirm output is not paused.
Open Settings → Schema output and enable Publish schema markup.
Confirm the post type is selected under Settings → Content types.
Confirm the content is publicly accessible and you are viewing its singular URL.
If using Pro, confirm the Template is Active and its condition matches in Assignment simulator.
Create nested schema is missing for a property
The action appears only when SchemaGrove knows the selected property accepts a compatible object type. Select an object-valued property such as logo, address, author, or offers. If Source is already Connected entity, choose the existing entity or change the source before creating a new child. The Advanced tab lists the property’s Expected types.
A Pro Template does not apply
Confirm you chose Save graph & return in the visual builder and then Save revision in Template settings.
Confirm State is Active (requires a condition), not Draft, Scheduled for later, or Archived.
Complete every condition value and remove empty subgroups.
Check whether the group uses All rules match (AND) or Any rule matches (OR).
Test the same post in Assignment simulator.
Duplicate schema appears on a page
Open Settings → Schema ownership and choose one coordinated owner. Lite does not rewrite another plugin’s settings. If another primary producer is active, Lite keeps SchemaGrove output off. Pro exposes integration or configured-content ownership only when the adapter can verify the safe behavior for that provider and request.
Site Graph is missing content or links
Confirm the public post type is enabled under Settings → Content types, then choose Refresh graph. Site Graph maps loaded WordPress content, stored links, and saved graph relationships within bounded display limits. Runtime-generated links are outside Site Graph. Pro Site Audit can inspect server-returned HTML and JSON-LD, but it does not execute client-side JavaScript or map those links.
A Site Audit is queued, paused, or failed
Choose Refresh first. Use Resume for a paused run or Retry for a failed run. If work never advances, check WordPress cron and open Settings → Support & diagnostics to review queues, scheduling, storage, and release compatibility before starting another run.
Pro license activation or private updates fail
Confirm compatible Lite and Pro versions are both active.
Confirm the key belongs to the purchased SchemaGrove product and the subscription is eligible.
Check the activation count on Pro License and release an old site in My Account → API Keys if needed.
Choose Refresh status after restoring outbound HTTPS connectivity.
If replacing a key, deactivate the stored license first.
Save failed or reports a revision conflict
Do not keep retrying over a newer revision. Preserve any values you need, reload the workspace, review the current saved version, and apply the change again. Also confirm the WordPress session is active and the account has permission to edit that content or approve the requested Pro change.
Need another set of eyes? Ask a Lite question in the SchemaGrove support forum on WordPress.org, or review the support policy for Pro assistance. Include the exact error, both plugin versions, and the smallest reproducible set of steps.
Privacy, uninstall, and reference
Know what stays local, what can contact an external service, and what happens when the plugins are removed.
Privacy and external services
Lite stays local. Schema graphs are stored in WordPress post metadata and settings in WordPress options. Lite does not send site content or personal data to an external service and makes no external AI request.
Pro licensing contacts SchemaGrove. Activation, bounded status checks, deactivation, update checks, and authenticated downloads use the SchemaGrove licensing service. The local key and activation token are encrypted with key material derived from WordPress authentication keys and salts.
Google Search Console is optional. It runs only after an administrator configures and authorizes it. Imported evidence is stored locally and is not sent to the SchemaGrove licensing service.
External OpenAI analysis is optional. The OpenAI provider is disabled by default and requires configuration, explicit enablement, separate external-data-sharing consent, and an authorized user starting an analysis. The local provider makes no external AI request.
Policy text is available. SchemaGrove adds suggested disclosure text to the WordPress Privacy Policy Guide. Review and adapt it to the optional services actually enabled on the site.
For the vendor website’s practices, read the SchemaGrove Privacy Policy.
Uninstall and data retention
Data is preserved by default. Deactivating or uninstalling without enabling cleanup is designed to retain durable graph and Pro records for recovery.
Create a backup. Export any individual graphs you want through Import / Export and keep a full database backup.
Decide whether data should remain. To erase plugin-owned durable data, open SchemaGrove → Settings → Data & cleanup, enable Remove data on uninstall, and choose Save settings before uninstalling.
Release a commercial activation when appropriate. Open Pro License and choose Deactivate license before deleting Pro. If the service is unreachable, Forget local credentials removes the local encrypted key and token but does not release the vendor-side activation.
Delete the plugins from WordPress. Uninstall, rather than simple deactivation, is what runs the cleanup routine.
Even when durable data is retained, Pro removes executable authority, outstanding approvals, scheduled callbacks, locks, derived runtime caches, and the private-download token during uninstall. Enabling cleanup also removes Lite saved graphs/settings and Pro tables and options owned by the installation.
Workspace reference
| Label | Purpose | Availability |
|---|---|---|
| Schema Graph | Build, validate, preview, import/export, and save a graph for one content item. | Lite and Pro |
| Templates | Manage reusable conditional graphs, assignment rules, and revisions. | Pro |
| Entities | Manage canonical real-world identity records and link them into graphs. | Pro |
| Site Graph | Map content hierarchy, stored links, schema relationships, and coverage. | Lite and Pro |
| Site Audit | Run and review versioned whole-site validation and rendered-page findings. | Pro |
| Settings | Manage Guided setup, Schema ownership, Schema output, Content types, and Data & cleanup. | Lite and Pro |
| Pro License | Activate, refresh, deactivate, or clean up local commercial credentials. | Pro |
Graph editor action reference
| Action | Meaning |
|---|---|
| Save schema | Save the current per-post graph revision. |
| Remove saved graph | Stop using that post’s saved SchemaGrove graph. It does not delete the WordPress post. |
| Import / Export | Transfer the current graph as JSON. Review imported content before saving. |
| Preview JSON-LD | Compile and display the generated document without requiring you to inspect page source. |
| Start over | Replace the whole workspace graph. The change is not permanent until saved and can be undone before leaving. |
| Validate | Check the current graph and report errors and warnings. |
| Auto-organize graph | Rearrange cards without changing schema meaning; Undo restores the previous layout. |
| Advanced → Remove property | Delete the selected property and its relationship from the current graph draft. |
Safe working habit: build on staging, back up before updates or cleanup, validate before every save, preview the effective JSON-LD, and verify one public URL before rolling a reusable Template across the site.